Pages

Monday, October 3, 2011

Glorious, Heathly Chocolate

cocoa bean plant
Cacao  Plant
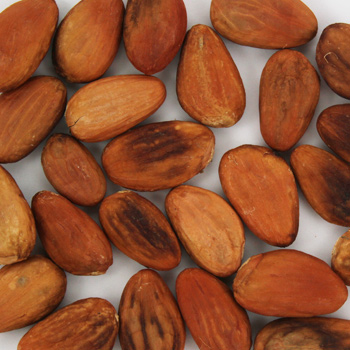
I am a chocolate lover.  Imagine my pleasure lately as I have been reading about  the benefits of eating chocolate.   Dark chocolate that is at least  60% cacao. The cacao bean where  cocoa  and chocolate are derived from is rich in antioxidants and other nutrients.  Did you know dark chocolate has more flavonoids than berries or tea?

Health Benefits of Eating Chocolate:

1. Flavonoids aid the blood flow to your brain and heart.
2. Cocoa powder has been found to lower your blood pressure and decrease the risk of a heart attack and stroke.
3. Chocolate has  been found to improve the circulation to your brain which helps memory and  learning.
4. Chocolate can help your muscles recover after a tough work out.
5. Blood platelets clump together more slowly in chocolate eaters.  Clumping platelets can lead to blood clots which can cause a heart attack.
6.Chocolate also lowers your bad cholesterol.
7. Dark Chocolate contains "Theobromine."  Theobromine has been  shown to harden tooth enamel.                          
8. Chocolate is high in vitamins and minerals. It has high concentrations of potassium, copper, magnesium, and iron.
9. Chocolate  improves your mood.

To get the health benefits listed you don't need to eat alot of chocolate.  You just need to eat one ounce a day.    Like I said earlier, it needs to be at least 60 percent cacao. If you see the words "processed with alkali or Dutch processed"  then most of the antioxidants have been destroyed during processing.

Throughout this blog, I have talked only about Dark chocolate.  This is the healthy chocolate.   It is not as sweet as other chocolates but work your way up to the recommended cacao content.  Also,  while you are enjoying your one ounce of dark chocolate, do not drink milk.  Milk can prevent the antioxidants to be absorbed in your body.


Cocoa Beans


 Delicious!!

Make today a healthy and tasty one -  go enjoy some chocolate.

Thursday, September 29, 2011

Happy Coffee Day

Today, September 29, 2011 is "National Coffee Day." Coffee is my  comfort drink.  I love the way it smells, tastes, and makes me feel.

Benefits of Drinking Coffee


1. Coffee drinkers are less likely to develop Type 2 Diabetes, Parkinson's diseas, and Dementia.
2. Coffee drinkers have fewer cases of heart rhythm problems and strokes.
3. The acidity in coffee helps fight acne.
4. Flavonoids in coffee have been found to inhibit the formation of UVB induced tumors.
5.  The caffine in coffee has been linked to an emotional uplift.
6.  Coffee improves your memory.
7.  It keeps you regular.
8. Eases muscle pain.  Drinking coffeee before a workout can prevent post-workout soreness.

According to the Mayo Clinic,  drinking  between 2-4 cups of brewed coffee a day is not harmful.


So go and enjoy a cup of coffee today.

Wednesday, September 28, 2011

Spaghetti and Meatballs: A Timeless Classic

Spaghetti and Meatballs is a favorite dinner, midnight snack  at my house.  The sauce is rich and thick with a hint of spiciness.  Add meatballs to this great tasting sauce  and you have a dish your  family loves.


Spaghetti Sauce


Ingredients:

2 tablespoons olive oil
1 medium onion diced
2 cloves of garlic minced
1 (28 ounce) can crushed tomatoes
1 (15 ounce) can tomato sauce
½ teaspoon baking soda
½ teaspoon black pepper
1 teaspoon dried basil
½ teaspoon crushed red pepper flakes
1-teaspoon salt
1 bay leaf
1-teaspoon sugar.
1-recipe Meatballs (see September 26, 2011 post)
Pasta cooked according to package directions
Grated Cheese


Directions:
1. In a large heavy bottom pot heat the olive oil and sauté the onion until translucent.  Add the minced garlic and cook for two minutes or until fragrant.
2.  Add the crushed tomatoes, tomato sauce, baking soda, black pepper, dried basil, crushed red pepper flakes, salt, bay leaf, and sugar.  Stir well to combine.
3.  Bring to a boil.   Add the meatballs to the sauce.   Cover and simmer for 1-1/2 hours stirring occasionally.  For a thicker sauce, remove the lid during the last 30 minutes of cooking.
4.  Adjust seasoning if necessary.  Remove Bay Leaf.
4.  Serve over cooked pasta of your choice topped with grated cheese.

Serves 6

Monday, September 26, 2011

Meatballs: A Classic Food

Today I am posting a recipe for "Italian Meatballs".    I use this recipe when I am making meatballs for spaghetti sauce*, meatball soup,  appetizers, pasta bakes, pizza topping, sandwiches, or just plain eating.

The meatballs are made with all-ground beef, spices, cheese, seasoned breadcrumbs, and an egg.  Simple ingredients when combined together result in a delicious meal.


                                            Italian Meatballs


Ingredients:

1-pound ground beef
1 egg beaten
¼ cup Italian style breadcrumbs
1-tablespoon onion powder
1-teaspoon garlic powder
1-teaspoon salt
½ teaspoon ground black pepper
1/3 cup shredded Parmigiano Reggiano cheese
2 tablespoons olive oil


Directions:

1. In a medium-mixing bowl, place the ground beef, beaten egg, breadcrumbs, onion powder, garlic powder, salt, pepper and cheese.
2.  Mix with your hands until the ingredients are well combined.
3. Measure the ground beef mixture using a measuring cup or a cookie dough scoop (depending on the size of meatballs you want) and shape into a ball.  Set aside.
4.  Heat the oil in a large skillet.  Place meatballs in skillet and brown on all sides.
Note: Do not cook the meatballs until they are completely done if you are going to use them in a sauce or soup.  Let them cook the rest of the way in the sauce or broth.
5.  Drain the meatballs on paper towels.  Add to your favorite sauce or soup broth.

Ingredients

Ready to Be Mixed

Ingredients Well Combined


The Meatball

In the Pan Getting Browned

Delicious Result


 * My recipe for "Spaghetti Sauce" will be posted on September 28, 2011.

Friday, September 23, 2011

The Greatness of Cast Iron

For years my husband  has been trying to get me to cook with cast-iron.  I just did not want to  for whatever the reason. Finally, he got me a cast-iron skillet, a bottle of vegetable oil and told me to go for it.  I will forever be grateful.  I love my cast iron cookware.  Today I am the proud owner of a cast iron skillet, griddle, and two enamel coated cast iron Dutch Ovens.

There are two types of cast-iron on the market -  bare cast-iron and enameled cast iron.  The bare cast iron is less expensive than the enameled cast iron.  Both cook wonderfully.

Cast-Iron History

Cast-Iron has been around for years and years. In fact, the first cast iron was made by the Chinese in the early sixth century BC.  In the Eighteenth century, cast iron was so valuable that it was bequeathed with other precious objects.  In the 1800's enameled cast iron came about.

Cooking With Cast Iron


Cast Iron is prized for its' durability and the ability to retain heat and distribute heat evenly. It can also withstand and maintain very high cooking temperatures.  This makes it a a great choice for searing or frying.  Its' excellent heat diffusion makes it a good option for long cooking like for stews or braised dishes.  You can bake a cake, cornbread, hamburger, sear a steak, even cook eggs in a cast iron skillet.  Another big plus is cast iron is versatile, it goes from stove top to the oven.

Other benefits of Cooking with Cast Iron:
1. The pans are non-stick once they are seasoned properly.
2. Cast Iron has no toxic chemicals.
3. It is fairly inexpensive (bare cast iron).
4.The pans can last a lifetime as long as you take care of it.


Seasoning  Bare Cast Iron

Seasoning creates a slick glossy coating by baking on thin coats of oil.   Today, you can buy seasoned cast iron pans. Seasoning your own pan is not difficult.  It just takes heat, oil, a brush to spread the oil, and paper towels.

1.  Preheat you oven to 325 degrees.
2.  Wash the new cast iron pan with hot soapy  water.  This removes any waxy protective coating .  ONLY USE SOAPY WATER THE FIRST TIME.
3.  Towel dry the  pan immediately.
4. Put a even coating of vegetable oil on the cooking surface of the pan.
5.  Bake for one hour.
6.  Remove the cast iron from the oven.  Let it cool to the touch. Redistribute  any excess oil in the pan.
7.  Put the cast iron in the pan and bake for another hour.
8.  Remove the cast iron from the oven.  Let it cool to the touch and if there is any excess oil wipe it with paper towels.
9.  Cool the pan completely and store the pan in a cool, dry place.  Do not stack cast iron.


Caring For Your  Bare Cast Iron

Cast Iron is easy to take care of.   To clean it you wash it in hot water shortly after use.    You can use a nylon scrubber to scrap off any food.  Dry the pan immediately with a towel.  Do not air dry it.  Store in a cool dry place.

Finally, you may need to re-season the pan sometime in the future.  Some of the seasoning has wore off and food sticks to the surface or there is rust.  Just properly clean your pan and follow steps 1-9 above.  For rust you will need to use fine steel wool, fine sandpaper or a wire brush to remove the rust.


Note:  During the first few uses of your pan you may need to first clean your pan, then heat it on the stove and add just enough vegetable oil to coat the surface. Wipe off any excess, turn off the stove, let the pan cool and store.


Enameled Cast Iron

Enameled cast iron has a vitreous enamel glaze.  The enamel coating prevents rusting and eliminates the need for seasoning.  This cookware is more costly than bare cast-iron.
When cooking with enameled cast iron use a low to medium heat setting.

Care of Enameled Cast Iron

Allow your pan to cool before washing it in soapy water.  Use a plastic scrubber when cleaning to protect your enamel.  If there are stains you can remove them with a mixture of one teaspoon bleach to one pint of water.  Hand dry your enamel cast iron. Do not air dry.

Cast Iron is very forgiving.  Just follow the seasoning, cleaning tips and you will have a pan that will last lifetimes.


Getting Ready to Re Season My Skillet


Brushing Vegetable Oil on Cast Iron Griddle

Before Going in the Oven to Be Seasoned

Seasoned Skillet


Wednesday, September 21, 2011

Brazilian Lemonade from "Our Best Bites"

The curious thing about this lemonade is that it is made with limes not lemons.  Whole limes to be exact.  The limes are blended with water, sugar, and condensed milk.  The result is a creamy, tangy, refreshing beverage.

I followed the directions almost to a "T" except I made a syrup of one cup sugar and two cups water instead of mixing the sugar and water.  I have better results making a syrup.

Helpful tip from "Our Best Bites":  Try to find limes with thin, smooth skins.  They are juicier and the thin skin cuts down on the chance of your drink being bitter.


                                                           Brazilian Lemonade
                                                           from "Our Best Bites"

Ingredients:

4 juicy limes
1 cup sugar
6 cups cold water
6 tablespoons sweetened condensed milk


Directions:

1.  Mix cold water and sugar very well.  Chill until ready to use.
      Note:  This step can be done ahead of time.
2.  Wash limes thoroughly with soap.  Cut the ends off the limes and then cut each lime into eighths.
3.  Place half of the limes in a blender.
4.  Add half of the sugar water.  Place the top on your blender and pulse 5 times.
5. Place a fine-mesh strainer over a pitcher (the one you will serve the lemonade in) and  pour the blended mixture through the strainer and into the pitcher.  Use a spoon to press the rest of the liquid into the pitcher.
6.  Dump the pulp and stuff in the strainer into the trash.
7.  Repeat with the remaining limes and sugar water.
8.  Add the sweetened condensed milk. Stir until mixed.
9.  Taste and adjust sweetness if needed - add some more sugar or milk.
10.  Serve immediately over lots of ice.

Makes 4 servings


Sugar, Water, Sweetened Condensed Milk, Limes

Ends cut-off of  the lime

Cutting the Lime

Cutting the Limes into Eighths

Limes in the Blender

Straining and Pressing Remaining Liquid

Adding Sweetened Condensed Milk

Brazilian Lemonade

Monday, September 19, 2011

Gingery Peach Mango Smoothie

Today was one of those busy days where I started out running.  On days like this, I blend up smoothies either for a quick breakfast or for a refreshing pick- me- up.  Smoothies are both nutritious and delicious.

One of my favorite fruit combinations to use in smoothies is peach mango. I find the peach mango fruit combination very satisfying and flavorful.  The following recipe adds vanilla yogurt, gingersnaps, and honey to the peaches and mango nectar  to make a tasteful and healthy smoothie. 


                                          Gingery Peach Mango Smoothie
Ingredients:

1 cup ice – omit if you are using frozen fruit
Delicious
2 cups sliced fresh or frozen peaches
1-cup vanilla yogurt
2 tablespoons honey
1/3 cup ginger snap pieces
1-cup mango nectar
Whipped Cream
2 tablespoons ginger snap crumbs for garnish


Directions:
1. Place ingredients in order listed in a blender.  If you need, poke the ingredients in the blender with a spoon to allow the nectar to flow down.
2.  Blend on high until smooth.
3. Pour in glasses and top with whipped cream and ginger snap crumbs.
4.  Serve.


Makes 4- 8-ounce servings


Ingredients
Ready to be blended