Pages

Wednesday, June 3, 2020

Chicken Enchilada Soup

This recipe is one of the family's favorite.  Tender bites of chicken in a rich and creamy base with a hint of spiciness.   You start with some carrots, onion, celery, and spices.  And  yes, a jalapeƱo.  Cook in some chicken broth with some tomatoes and corn tortillas.  When the soup is ready, blend in an immersion blender.  Add the chicken and some heavy cream, stir and heat through.  Ladle into a bowl and top with sour cream, cheese and some tortilla  chips.
A great soup for a light dinner served with a salad or have cup for lunch.  Enjoy.


Chicken Enchilada Soup
Our Best Bites
Ingredients

1 medium onion, chopped
5–6 cloves garlic, chopped
2 carrots, peeled and chopped
2 stalks celery, chopped
1 red bell pepper, chopped
1 jalapeno pepper, chopped (remove the seeds and membranes to cut down on the heat)
1 1/2 teaspoons chili powder
1 heaping teaspoon cumin
1 heaping teaspoon ground coriander
1 teaspoon dried oregano
3/4 teaspoon smoked paprika
6 cups chicken broth
1 14.5-ounce can diced tomatoes, divided
1 cup water
5–6 6″ yellow corn tortillas
kosher salt and freshly ground black pepper to taste
Shredded breast meat from 1 medium rotisserie chicken
1/2 cup heavy cream
chopped green onions
sour cream
shredded cheddar or pepper jack cheese

Instructions

1.In a large soup pot or Dutch oven, heat 2 tablespoons of extra-virgin olive oil over medium heat. When hot, add the onion, garlic, carrots, celery, bell pepper, and saute until fragrant and the vegetables are tender.

2.While the vegetables are cooking, combine the chili powder, cumin, coriander, oregano, and smoked paprika. When the vegetables are tender, add the spices and stir to combine. add the chicken broth, 1/2 cup diced tomatoes, and water and then blend until smooth using an immersion blender (you can also it in batches in a regular blender). Bring to a boil and tear the tortillas and add them to the soup (6 will be pretty thick, it just depends on personal preference). Cover and turn the heat down to low and simmer 30-45 minutes or until the tortillas are breaking apart. Remove from heat. Whip out your immersion blender again and blend until smooth. Add the remaining tomatoes, the shredded chicken breast meat and the cream and stir until combined. Season to taste with salt and pepper. Serve immediately with green onions, shredded cheese, and fried tortilla strips.

Monday, June 1, 2020

Classic Sandwich Bread

I have been making most of our bread lately.  I have made several delicious loaves, but this recipe from King Arthur Flour is my go to one.  It is easy to follow, easy to make, and comes out perfect nearly every time.

It is very easy to slice whether you like thin or thick slices and it does not crumble or fall apart. Perfect for sandwiches and  toast and French Toast. Make a loaf and see what you think.

Classic Sandwich Bread
From King Arthur Flour

Ingredients
3 cups (361g) King Arthur Unbleached All-Purpose Flour
1/2 cup (113g) milk (skim, 1%, 2% or whole, your choice)*
1/2 to 2/3 cup (113g to 152g) hot water, enough to make a soft, smooth dough* (see "tips," below)
4 tablespoons (57g) melted butter or 1/4 cup (50g) vegetable oil
2 tablespoons (25g) granulated sugar
1 1/4 teaspoons salt
1 packet active dry yeast dissolved in 1 tablespoon warm water OR 2 teaspoons instant yeast


Instructions

To make the dough: In a large bowl, combine all of the ingredients and stir until the dough starts to leave the sides of the bowl. Transfer the dough to a lightly greased surface, oil your hands, and knead it for 6 to 8 minutes, or until it begins to become smooth and supple. Or mix and knead the dough using an electric mixer or food processor, or in a bread machine set to the dough or manual cycle.

Transfer the dough to a lightly greased bowl, cover the bowl, and allow the dough to rise until puffy though not necessarily doubled in bulk, about 1 to 2 hours, depending on the warmth of your kitchen. If you're using a bread machine, allow the machine to complete its cycle, then leave the dough in the machine until it's doubled in bulk, perhaps an additional 30 minutes or so.

Gently deflate the dough and transfer it to a lightly oiled work surface. Shape the dough into an 8" log.


Place the log in a lightly greased 8 1/2" x 4 1/2" loaf pan, cover the pan loosely with lightly greased plastic wrap, and allow the bread to rise for about 60 minutes, until it's domed about 1" above the edge of the pan. A finger pressed into the dough should leave a mark that rebounds slowly. Towards the end of the rise, preheat your oven to 350°F.

*Mix cold milk with hot tap water to make a lukewarm liquid before adding to the remainder of the ingredients.

Friday, May 29, 2020

Cheesy Crustless Quiche

Quick is a nice dish to serve for lunch, brunch, or a tea.  This recipe is so easy to make because you don't need to worry about making a crust.  For me, that is a plus.

This recipe is pretty versatile.  I din't have the cherry tomatoes and my family hates green onions so I just topped it with bacon.   I also substituted Gruyere cheese for the Swiss cheese.

The quiche came out perfectly.  It is very creamy and it was delicious.   The combination of the cheeses added to the flavor as did the Dijon mustard.  The family loved this recipe.  Next time, I will be sure to have the cherry tomatoes on hand.    You can get the original recipe here  Simply Recipes.   My rendition is below.


Cheesy Crustless Quiche
From Simply Recipes Adapted Slightly From My Southwest Kitchen

INGREDIENTS
1/2 stick of butter (1/4 cup)
1/4 cup all-purpose flour
3/4 cups milk
1 cup cottage cheese
1/2 teaspoon baking powder
1/2 teaspoon salt
1/2 teaspoon Dijon mustard
5 eggs
4 ounces cream cheese, softened
6 ounces shredded Gruyere cheese
3 slices of cooked bacon, crumbled

Directions:
1 Make a roux: Melt the butter in a medium saucepan on medium heat. Stir in flour; cook, stirring until bubbly.
Gradually add the milk; cook over medium heat, stirring occasionally, until sauce thickens.
Remove from the heat; set aside to cool, about 15-20 minutes.
2 Preheat oven to 350°F. Combine cottage cheese, baking powder, salt and mustard; set aside.
3 Make the filling: Beat the eggs in a large mixing bowl. Slowly add the cream cheese, the cottage cheese mixture and the milk/flour sauce.
Stir in the Gruyere and Parmesan cheeses.
4 Bake: Pour into a buttered 10" pie plate. Sprinkle the top with chopped  crumbled bacon.
Bake at 350°F for 40 minutes, until puffy and lightly browned. A knife inserted into the center of the quiche should come out clean. Let rest for 15 minutes, serve.

Serves 8

Wednesday, May 27, 2020

Chicken and Stars Soup

When I was little, Chicken and Stars soup from Campbell's  was my favorite soup.  I loved the little star shaped pasta.   Fast forward a few decades, and I am making Chicken and Stars soup a la Saucier.

I start by removing the meat from a rotisserie chicken and shredding it.  In a large pot I add chicken broth, the shredded chicken, vegetables, seasoning and some herbs.   I let the soup simmer for about 30 minutes or until the carrots are tender.  I then add the stelllini (star shaped pasta) and cook until the pasta is done - about 3 minutes.  I then whisk in some butter, and lemon juice.  Lemon juice makes this soup pop.   I taste and add additional seasoning if necessary.

A hearty bowl of soup loaded with veggies, chicken, and pasta.  A delicious bite in every spoonful.  


Chicken and Stars Soup
Ingredients:
1 rotisserie chicken, meat removed from bones and shredded
8 cups chicken stock
1 teaspoon onion powder
1 teaspoon garlic powder
1 teaspoon salt
1/2 teaspoon ground black pepper
4 medium carrots thickly sliced
3 celery stalks thickly sliced
1 teaspoon dried thyme
1 bay leaf
1 teaspoon dried tarragon
1 tablespoon dried parsley
3/4 cup stellini (tiny star pasta)
3 tablespoons butter
1 tablespoon lemon juice

Directions:

1. In a 6-quart pot, place the shredded chicken meat and the other ingredients up to the stellini (pasta).   Stir well and bring to a boil.  Reduce heat, cover and simmer for 30 minutes or until the carrots are tender.
2. Add the pasta to the pot and cook for about 3 minutes or until the pasta is done.
3. Whisk in the butter and lemon juice.  Taste and add more salt and pepper, if needed.
4. Ladle soup into bowls and serve.

Serves 6


Friday, May 22, 2020

Grilled Halibut with Lemon-Basil Vinaigrette

An easy recipe and tasty recipe for grilled halibut.    Perfect for summer weather.  The halibut filets are grilled in a somewhat tangy lemon vinaigrette with basil and capers.  The result is a delicious piece of fish that is nice, moist and very flavorful.   A nice dish for a light and satisfying meal.


Grilled Halibut with Lemon-Basil Vinaigrette
Epicurious

INGREDIENTS

2 1/2 tablespoons fresh lemon juice
2 tablespoons olive oil (preferably extra-virgin)
2 garlic cloves, crushed
1/2 teaspoon grated lemon peel
3 tablespoons thinly sliced fresh basil or 3 teaspoons dried
2 teaspoons drained capers
4 5- to 6-ounce halibut filets (about 3/4 inch thick)

PREPARATION

1.Whisk lemon juice, olive oil, crushed garlic cloves and grated lemon peel in small bowl to blend.  2. Stir in 2 tablespoons fresh basil and capers. Season vinaigrette to taste with salt and pepper. (Can be prepared 1 hour ahead. Let stand at room temperature.)
3. Prepare barbecue (medium-high heat) or preheat broiler. Season halibut steaks with salt and pepper. Brush fish with 1 tablespoon vinaigrette, dividing equally. Grill or broil halibut steaks until just cooked through, about 4 minutes per side. Transfer fish to plates. Rewhisk remaining vinaigrette; pour over fish. Garnish fish with remaining 1 tablespoon basil and serve.

Serves 4


Wednesday, May 20, 2020

Famous Blueberry Muffins

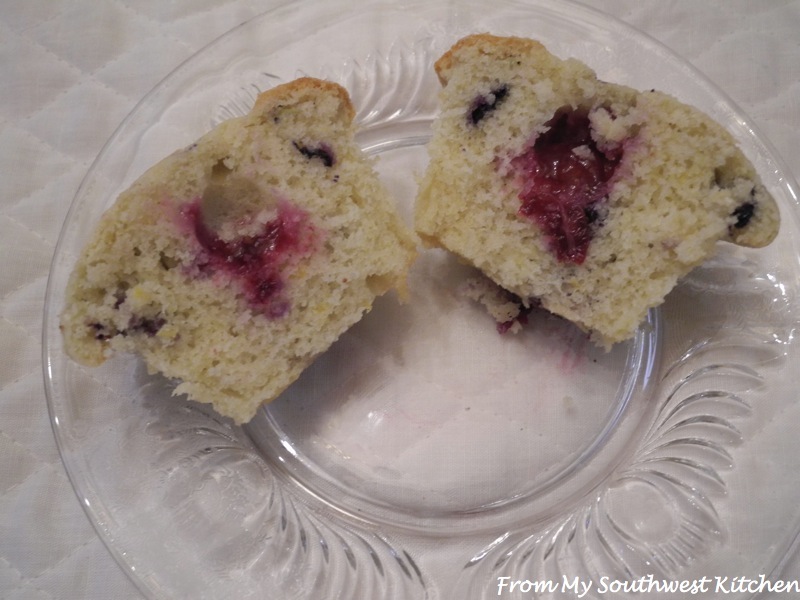
These are the best blueberry muffins I have ever made.  The family agreed.    This recipe is a clone of the Jordan Marsh Department Store blueberry muffins.    I pretty much followed the recipe except that I added 1 tablespoon of lemon zest.  I love the lemon blueberry combination.  MMM.

This was a very easy recipe to make. The batter came out perfect and the crushed blueberries added great flavor.  Don't skip the sugar on top - it kicks the muffins up a notch.  These muffins where chocked-full of blueberries and they were very moist.  They were delicious.  I am going to make another batch as soon as I finish writing this post.


Famous Blueberry Muffins
King Arthur Flour

Ingredients

8 tablespoons (113g) butter, at room temperature
1 cup (198g) sugar
2 large eggs
2 teaspoons baking powder
1/2 teaspoon salt
1 teaspoon vanilla extract
2 cups (241g) King Arthur Unbleached All-Purpose Flour
1/2 cup (113g) milk
2 1/2 cups (354g) blueberries, fresh preferred
1 tablespoon lemon zest
1/4 cup (50g) sugar, for topping


Instructions

1. Preheat the oven to 375°F. Lightly grease a standard 12-cup muffin tin; or line the tin with papers, and grease the papers.

2. In a medium-sized bowl, beat together the butter and sugar until well combined.

3. Add the eggs one at a time, scraping the sides and bottom of the bowl and beating well after each addition.

4. Beat in the baking powder, salt, and vanilla.

5. Add the flour alternately with the milk, beating gently just to combine. Scrape the bottom and sides of the bowl.

6. Mash 1/2 cup of the blueberries. Add the mashed and whole berries to the batter,  along with the lemon zest, stirring just to combine and distribute.

7. Scoop the batter by the heaping 1/4-cupful into the prepared muffin pan; a muffin scoop works well here.

8. Sprinkle about 1 teaspoon granulated sugar atop each muffin, if desired. It's traditional — go for it!

9. Bake the muffins for about 30 minutes, until they're light golden brown on top, and a toothpick inserted into the middle of one of the center muffins comes out clean.

10. Remove the muffins from the oven, loosen their edges from the pan, and after about 5 minutes transfer them to a rack to cool.

Makes 12 muffins